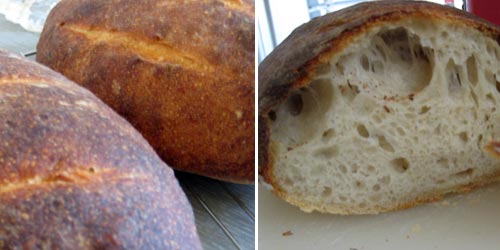
Finally I’m going to tell you about how I used the Sourdough Starter I started over a month ago!
First off, I have to be honest that I didn’t really think the whole thing would work because it just seemed to me that so many things can go wrong: didn’t use the right amount of flour or water, temperature not optimal, contamination by other yucky organisms, etc etc. I literally thought of every possible thing that could have gone wrong, just to prepare myself to not get disappointed when it failed. But the sourdough gods must have been smiling on me because not only did I manage to get a decent starter going, but the bread that I eventually made with the starter turned out quite good!
Bread-making is obviously not for people who are impatient, as it requires long stretches of waiting. At the same time, it is also one of the least labor-intensive type of cooking one can do, especially if one owns a stand mixer. You literally mix up the dough, knead it for a while, leave it alone while you go do something else, quickly shape the loaves, leave it alone again, and bake.
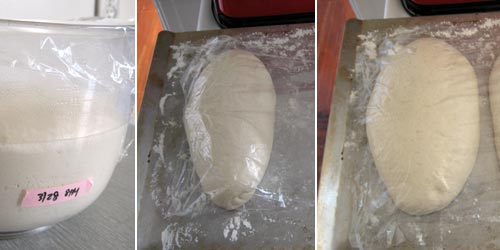
This time around, I tried out a schedule that ended up working quite well. I mixed the dough on a late Saturday afternoon and then left it to rise overnight in my cool kitchen. By the time I woke up on Sunday morning (left panel), it had risen about 2 to 3 times its initial volume (marked by the pink tape) and was ready to be shaped into loaves. It took all of 15 minutes to shape the dough into two batards (middle panel), after which I went out and ran some errands for a few hours. By the time I came back, the loaves had puffed (right panel) and were ready to be baked.
The final result had plenty of big holes – my simplistic metric for “good” bread – and a pretty authentic, tangy flavor. Nathan devoured half a loaf within the span of 30 minutes, so I’d venture to say the bread was a success! ;)
4 cups bread flour
1¼ cups cool water
1 Tbsp + 1 tsp kosher salt
1½ cups vigorous starter (see here for how to invigorate a refrigerated starter)
Put flour in bowl of stand mixer or large mixing bowl. Add water and mix (low speed with paddle attachment or with wooden spoon) until thoroughly combined. Let rest for 10 min. Sprinkle salt and mix quickly to combine. Pour in starter and mix again (medium speed with dough hook or with wooden spoon).
If using stand mixer, keep it going for about 12 min. After a few min, the dough should start gathering into a ball and climbing up the dough hook, basically cleaning the bowl for you. Add extra flour by the Tbsp if this doesn’t happen (believe me, it will!). Transfer to a lightly floured surface and knead by hand for another 5-10 min until you can stretch a small piece of dough between your hands and it doesn’t tear right away (the windowpane test).
If making by hand, you want to get the same final product (i.e. windowpane) but you’ll need to knead for about 15-20 min on a lightly floured board and also add flour by the Tbsp.
Pat the dough into a ball and place in a large, oiled bowl. Flip the dough over so that you coat the whole outside with oil. Cover with plastic wrap and let rise until doubled. This can take anywhere from 4 hours in a warm place or overnight in a cool place. If you want to refrigerate it overnight, make sure you let it stand at room temperature for 2 hours before moving on.
Transfer dough to lightly floured surface, divide into 2 pieces, and gently form loose balls. Cover with plastic wrap (can be the same one you used before if it fits). Let rest for 10 min.
Shape the dough into the shapes you want, either large rounds or batards, on a lightly floured baking sheet. Let rise until increased in size, about 1.5 to 2 times, and pressing a finger leaves an indentation. About 45 min before baking, put a baking stone on a rack on the lower third of the oven, a rimmed baking pan on the floor of the oven, and preheat to 450F.
Slash the top of the loaves and sprinkle a bit of water over the loaves (if you have a mister, you can use that instead). Put ½ cup of cold water into a measuring cup and add enough ice cubes to bring to 1 cup. Quickly put the baking sheet directly on the baking stone, pour the ice water in the baking pan, and immediately close the door to keep the steam in.
After 5 min, repeat the ice water procedure. After 15 more min, rotate the baking sheet front to back. Bake for another 25 min (for total of 45 min) or until the bread is deep brown and sounds hollow when you tap it on the bottom. Transfer to wire racks to cool.
—
Yield: 2 loaves of bread
Time: 30 min prep + 6-8 hrs rising + ~1 hr baking


8 Comments
Hi,
Thanks for your great postings, pictures are so very useful. Like you, I’m taking my time thinking about it and being rather busy at the moment, I don’t want to start a starter and not be able to get it to a usable state. But I wanted to ask you, what do you do with the left-over starter after feeding? You say you take a quarter of a cup of the starter and add the feed to it, do you keep what’s left in another jar and feed in it’s own right? It would be a shame to waste whatever goodness there may be there.
Thanks Caramella! Actually, I’m still trying to experiment with different things to do with the leftover starter after feeding. During the weeks when I was still starting up the starter, I just threw the leftover starter away (basically, what’s left after I take out the 1/4 cup). Now that I have a starter going which I usually keep in the fridge, I try to do other things with the leftover. Basically, I bake bread maybe every other week and so I generate about 2 cups worth of leftover starter that often. I’ve tried making sourdough pancakes (decent) and adding more flour to the starter to make dough for flatbreads (pretty good). I’ll post both of these recipes sometime. I’ve also used some leftovers to dry and store in the freezer, in case something tragic happens to the one I have going (video instructions here: http://www.breadtopia.com/drying-sourdough-starter-for-long-term-storage/).
Some other things I’m planning on experimenting with are sourdough waffles (once I find someone with a waffle iron) and using the starter to make pizza dough (unlike the flatbreads, I would actually let the pizza dough rise).
YEASTY
Angi,
Thank you so much for your great post and the terrific pictures. I’ve been struggling with get my starter refreshed properly for baking bread. I usually use the poolish method or direct method. I am a fairly experienced baker but have just begun to try to understand the sourdough process in terms of a systematic method of doing the steps and understanding the timing required for the various steps in the sourdough process, leading up to the final proofing and baking. I made Nancy Silverton’s starter (grapes, 14 days) years ago and have kept it alive but have been having some problems with the refreshing and getting it to a point where it is strong enough to kick the loaf up for a good rise in the bannetons and in the oven. I know it’s “operator trouble”. Anyway, I’ll carefully study your post. Thanks so much for your excellent presentation, photos and explanation.
Howard
Hi Angi,
Thanks so much for the link. Discussing sourdough with my Mum, she told me that her grandmother would make a large batch of starter and then dry it in thin round cakes for use later. This is just it! I now need to bring up some courage to make my own starter.
Caramella
homemade bread is great. yummy.
Thank you, everyone! Glad my sourdough adventures are possibly helpful to others and at least somewhat entertaining. :)
angi
I came across this site from Google and found this post quite delicious!